Why?
I've been using Strava for over 5 years to track my activities, and more recently analyse them too. Towards the end of 2019 I realised that I was getting close to running 1,000km in a year, so I started a basic spreadsheet to track the data so that I could plan my runs accordingly and hit my goal. The spreadsheet was a basic setup that just plotted distance run vs distance I needed to run, but it got me to the end of the year, and I managed to pass my target. As 2020 began I started to update the spreadsheet to calculate more detailed stats, and more in-depth analysis.
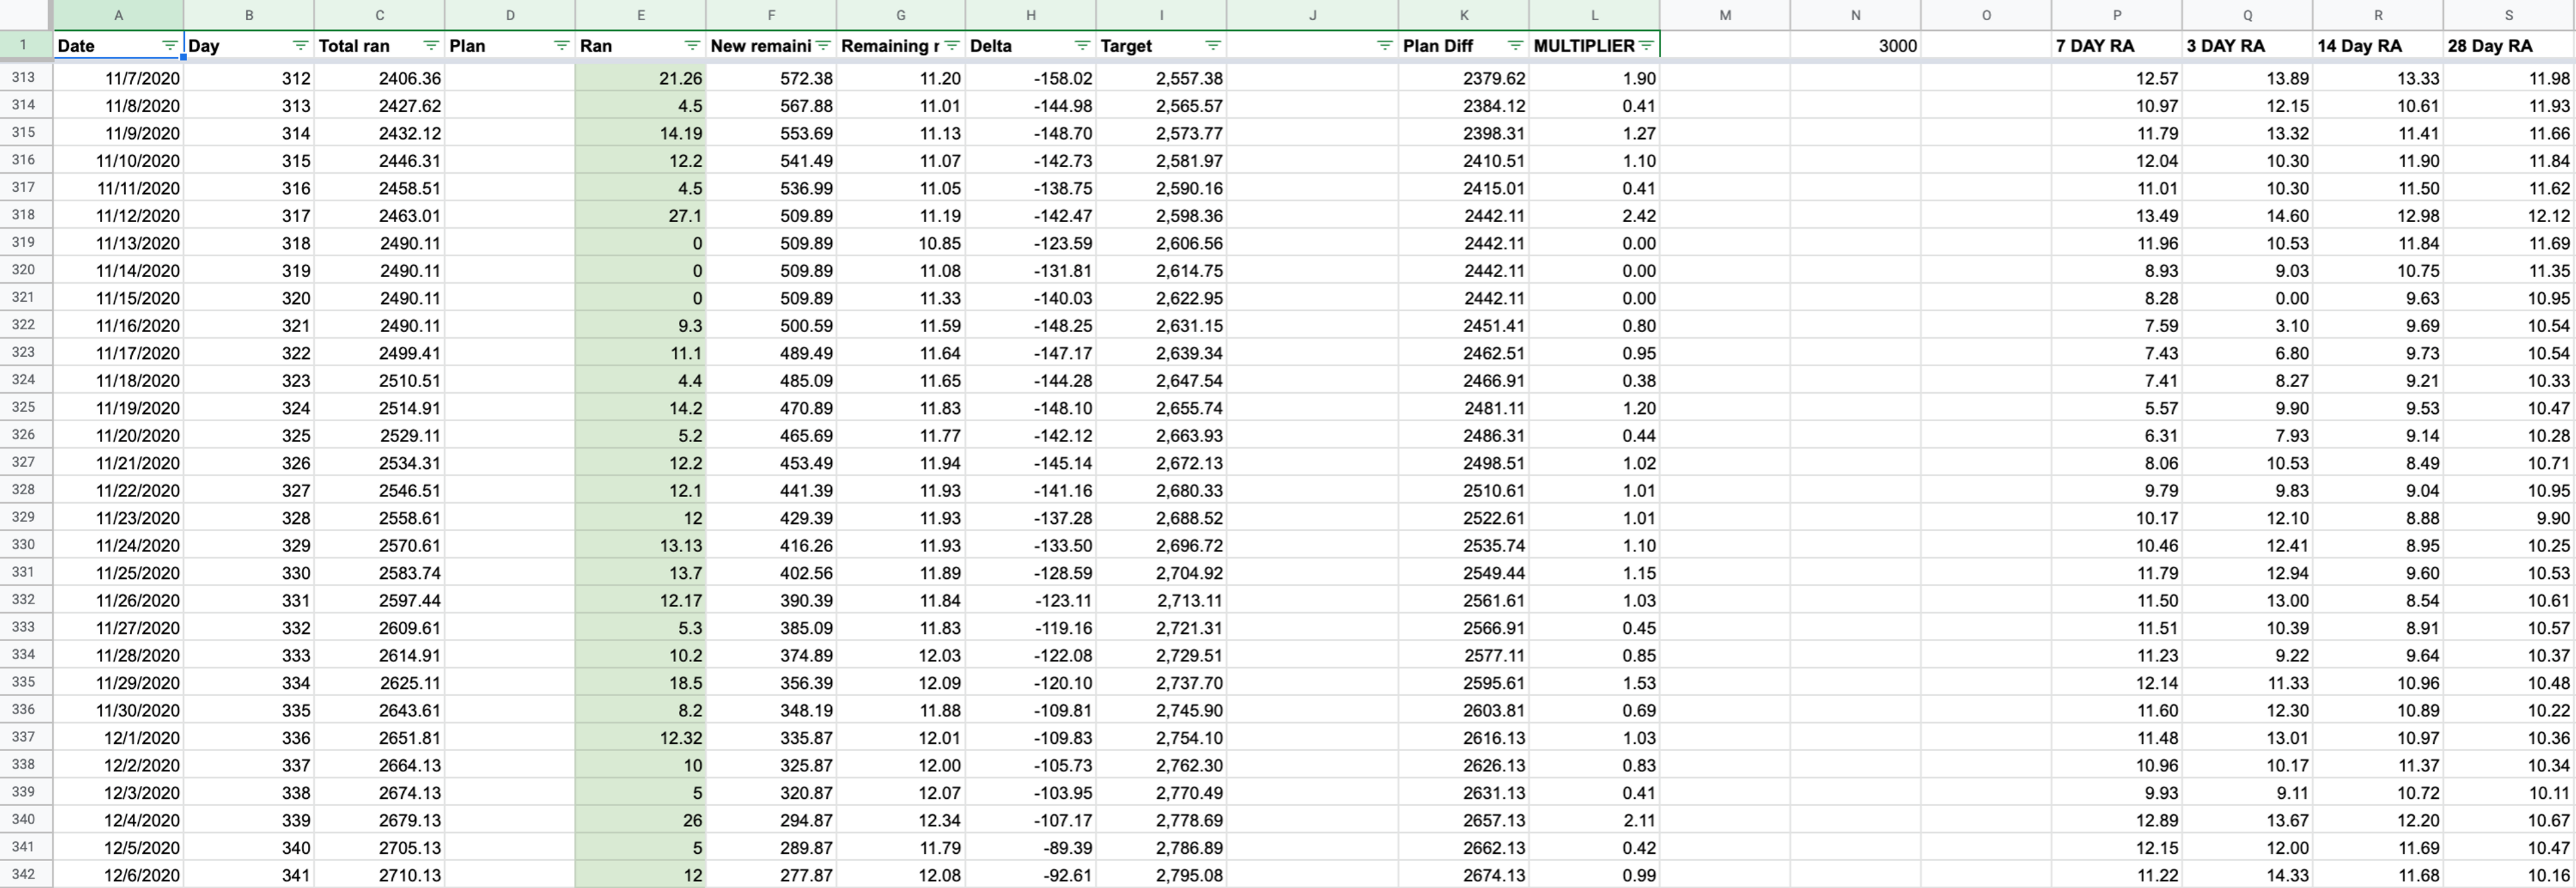
Adding activities manually every time I completed them is tedious and more importantly, minor distance discrepancies were making my analysis inaccurate - Although my entries are only a few metres out per activity it all adds up after a hundred or so and the analysis ends up wrong!
Automation of the activity entries is the best and easiest way to manage my data. There are a few scripts out there that allow downloading of your activities to a CSV, however these also involve a manual step which is not ideal.
Let's build a web app to use the Strava API to retrieve activity details and store them in Redux.
Building the web app
We're going to do this in a few sections:
- Create the app and install the core dependencies
- Get a Strava API key/secret
- Setup the API client
- Get the Auth tokens
- Get some activities (part 2)
- Display activities in a table (part 2)
Create the app and install the dependencies
First we want to get the core app setup, and the needed dependencies installed.
1npx npx create-react-app strava-api-app After it creates the app and installs the dependencies go to the directory:
1cd strava-api-app Then we need to install everything that we need. I'm using yarn but npm is also good!
1yarn add redux react-redux react-router react-router-dom connected-react-router redux-saga history@4.10.1 Setup the store
Create the Auth state src/redux/reducers/auth.js
1// file: src/redux/reducers/auth.js
2const initialState = { isAuthenticated: false, };
3
4export default function (state = initialState, action) {
5  if (!action) return state;
6  switch (action.type)
7    { default: return state; }
8}
Create a reducers index file src/redux/reducers/index.js. Here we will add our reducers to handle the app data. For now we will just add the core reducers that we start with.
1// file: src/redux/reducers/index.js
2import { combineReducers } from "redux";
3import { connectRouter } from "connected-react-router";
4import auth from "./auth";
5
6export default (history) => combineReducers({ router: connectRouter(history), auth });
Create a Saga index file src/redux/sagas/index.js. For now this will do nothing.
1// file: src/redux/sagas/index.js
2// single entry point to start all Sagas at once
3
4export default function* rootSaga() { }
Create a file in the src directory named configureStore.js. We will import our reducers and sagas into the store.
1// file: src/configureStore.js
2import { createBrowserHistory } from "history";
3import { applyMiddleware, compose, createStore } from "redux";
4import { routerMiddleware } from "connected-react-router";
5import createSagaMiddleware from "redux-saga";
6import createRootReducer from "./redux/reducers";
7import rootSaga from "./redux/sagas";
8
9const sagaMiddleware = createSagaMiddleware();
10export const history = createBrowserHistory();
11const configureStore = (initialState = {}) => {
12  const enhancers = [];
13  const __DEV__ = process.env.NODE_ENV !== "production";
14  if (__DEV__) {
15    const { devToolsExtension } = window;
16    if (typeof devToolsExtension === "function") {
17      enhancers.push(devToolsExtension());
18    }
19  }
20  const middleware = [routerMiddleware(history), sagaMiddleware];
21  const rootReducer = createRootReducer(history);
22  const store = createStore(rootReducer, initialState, compose(applyMiddleware(...middleware), ...enhancers));
23  sagaMiddleware.run(rootSaga);
24  return store;
25};
26export default configureStore();
Finally in the index file we need to make some updates. First add a few imports so we can use the store. Then update the render to add the <Provider></Provider> with the store, and the <ConnectedRouter></ConnectedRouter> with the history.
1// file: src/index.jsx
2// Add
3import { ConnectedRouter } from "connected-react-router";
4import { Provider } from "react-redux";
5import storeConfig, { history } from "./configureStore";
6
7// Update
8ReactDOM.render(
9  <React.StrictMode>
10    <Provider store={store}>
11      <ConnectedRouter history={history}>
12        <App />
13    </ConnectedRouter>
14    </Provider>
15  </React.StrictMode>,
16  document.getElementById("root")
17);
With this you can start the app with yarn start and when it boots you should see the normal CRA landing page and in the console you should see "Hello!".
Get a Strava API key/secret
- Login to Strava
- Go to the developer API page in your settings
- Create an app
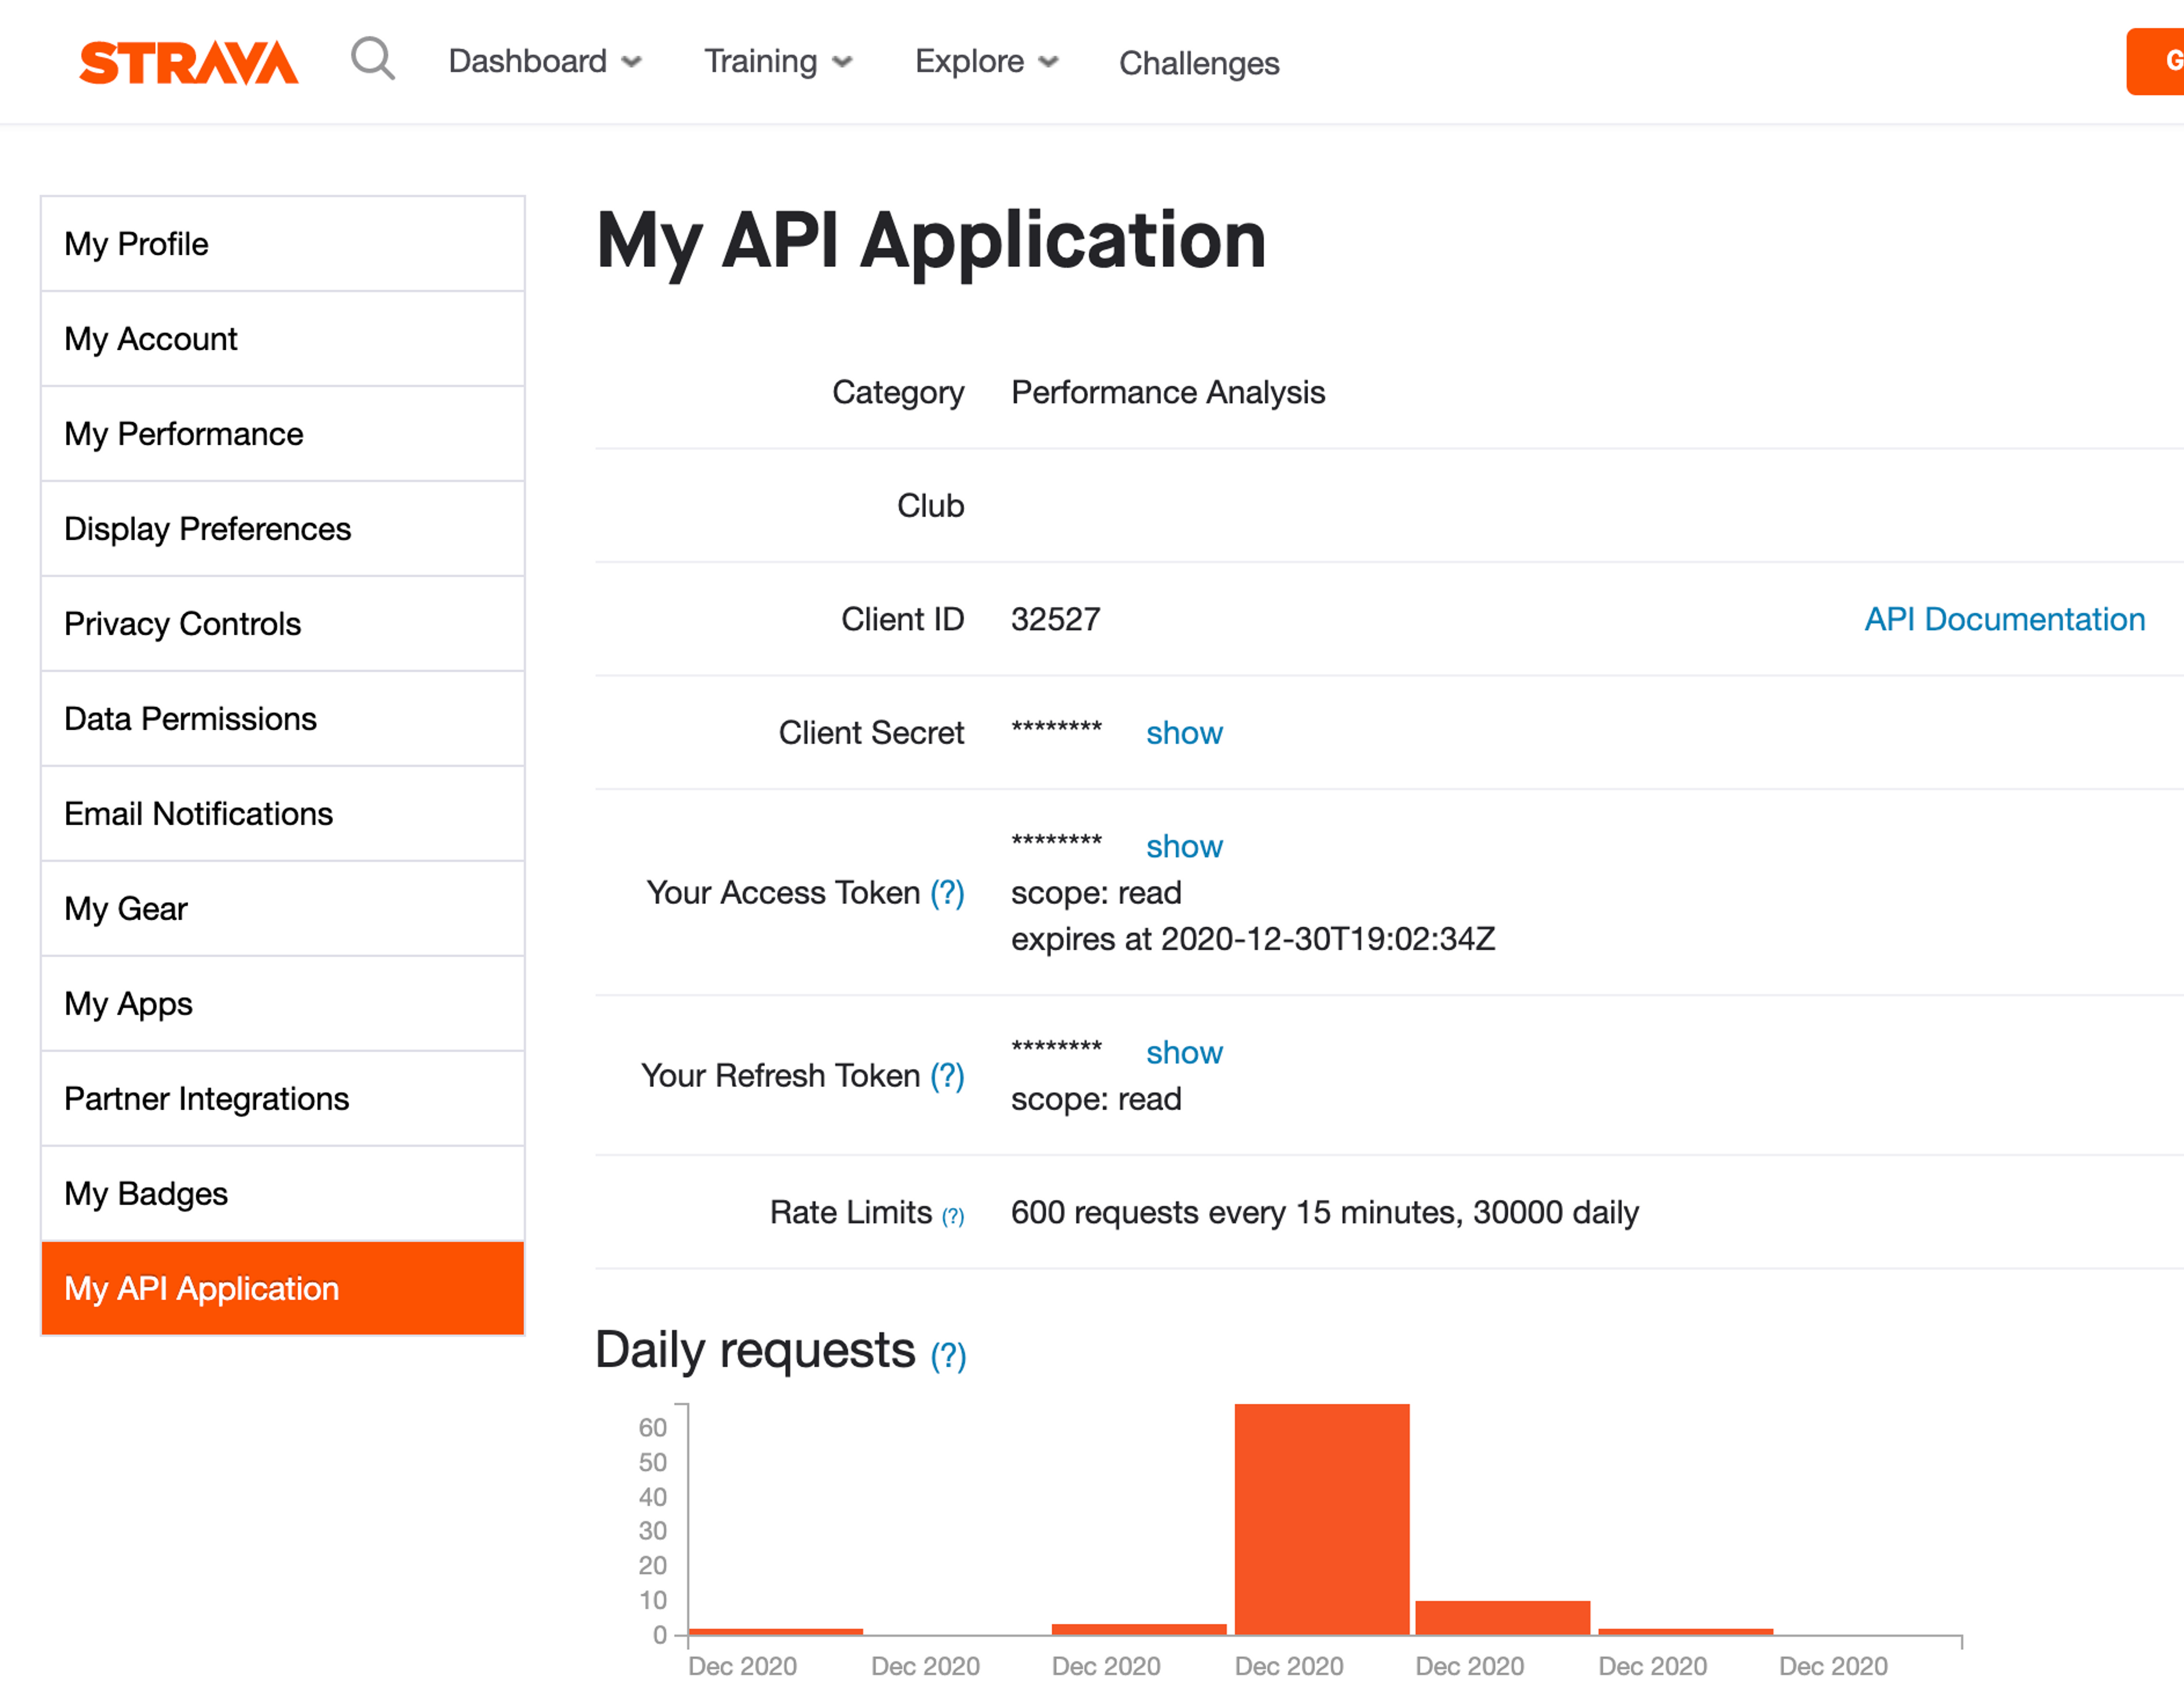
- You should see some details for your app. The key ones are
Client SecretandYour Access Token
Setup the API client
For the API client we're going to use axios - It's very similar to the built in fetch but is more compatible with older browsers out of the box and I prefer the configuration. If you prefer fetch then you can use it but you will need to "translate" the API calls accordingly.
Create a file for the api configurations in src/api/index.js. This will contain 2 clients configs and an interceptor for the apiClient that handles the extra authorization.
1import axios from "axios";
2
3export const tokenClient = axios.create({ baseURL: "https://www.strava.com/oauth", timeout: 3000 });
4const apiClient = axios.create({ baseURL: "https://www.strava.com/api/v3", timeout: 3000 });
5apiClient.interceptors.request.use((config) => {
6  const token = localStorage.getItem("accessToken");
7  if (token) {
8    // eslint-disable-next-line no-param-reassign
9    config.headers.Authorization = `Bearer ${token}`;
10  }
11  return config;
12}, (error) => {
13  Promise.reject(error);
14});
15export { apiClient };
Get the Auth tokens
The strava API allows a user authorize your app, which redirects back to your app with a token. The token can then be used to check the required scopes are correct and obtain a short-lived access token, refresh token and expiry date. These tokens are then used to retrieve data or a new token.
NOTE: In this tutorial I will be sending my applicationsecret keyfrom the front end. This is NOT SECURE! The token is visible in the code for all to see. It should be sent by a backend service. In a future post I will cover setting upNetlify functionsto keep the secret a secret. DON'T use this for production code.
Let's create some constants to be used around the app...
1// file: src/redux/constants/auth.js
2export const STRAVA_AUTH_START = "STRAVA_AUTH_START";
3export const STRAVA_AUTH_TOKEN_VALIDATE = "STRAVA_AUTH_TOKEN_VALIDATE";
4export const STRAVA_AUTH_TOKEN_UPDATE = "STRAVA_AUTH_TOKEN_UPDATE";
5export const STRAVA_AUTH_LOG_OUT = "STRAVA_AUTH_LOG_OUT";
Then lets start creating actions for the authentication life cycle... Authenticate, validate, update, deauthenticate.
1// file: src/redux/actions/auth.js
2import {
3  STRAVA_AUTH_LOG_OUT,
4  STRAVA_AUTH_START,
5  STRAVA_AUTH_TOKEN_UPDATE,
6  STRAVA_AUTH_TOKEN_VALIDATE
7} from "../constants/auth";
8// To begin auth we request app access from strava and the user logs in. A token is returned
9export const beginStravaAuthentication = () => ({ type: STRAVA_AUTH_START });
10// The token must be validated against the app client id and secret
11export const validateStravaToken = (code) => ({ type: STRAVA_AUTH_TOKEN_VALIDATE, payload: code });
12// A validated app access only lasts so long. After a while we need to request a new token.
13// When we do the new tokens must be saved
14export const updateAuthTokens = ({
15                                   refresh_token: refreshToken,
16                                   expires_at: expiresAt,
17                                   access_token: accessToken
18                                 }) => ({
19  type: STRAVA_AUTH_TOKEN_UPDATE,
20  payload: { isAuthenticated: true, refreshToken, expiresAt, accessToken }
21});
22// A user must be able to log out. When the app recieves this request we will remove all data from storage, remove tokens and deauth the app with Strava.
23export const beginStravaDeauthentication = () => ({ type: STRAVA_AUTH_LOG_OUT });
Create a src/pages/HomePage.jsx component - We will use this to login / out and sync data.
1const HomePage = () => { return ( <div>Home</div> ) } export default HomePage; Create a src/pages/Token.jsx component - This will eventually handle the incoming token from Strava. For now we just add a placeholder contents.
1const Token = () => { return ( <div>Token recieved</div> ) }
2
3export default Token;
Open up src/App.js and replace the contents with the following which includes the routes for the initial app and the 2 new components we just created.
1// file: src/App.js
2import { Route, Switch } from "react-router";
3import Token from "./pages/Token";
4import HomePage from "./pages/HomePage";
5
6const App = () => {
7  return (<div><Switch> <Route path="/token" exact component={Token} /> <Route path="/" exact component={HomePage} />
8  </Switch></div>);
9};
10export default App;
Update the HomePage to the following:
1// import redux hooks import { useSelector, useDispatch } from "react-redux"; // import the begin auth action import {beginStravaAuthentication} from "../redux/actions/auth"; const HomePage = () => { // get the auth state (so we can use to hide the button when the use// import redux hooks
2import { useSelector, useDispatch } from "react-redux";
3// import the begin auth action
4import { beginStravaAuthentication } from "../redux/actions/auth";
5
6const HomePage = () => {
7  // get the auth state (so we can use to hide the button when the user is authenticated)
8  const auth = useSelector((state) => state.auth);
9// create a dispatch
10// function const dispatch = useDispatch();
11  return (
12    <div>
13      <h1>Home</h1>
14      {/* Use the auth state to show hide the button */}
15      {auth.isAuthenticated ? (<h2>Logged in</h2>) : (
16        // add the dispatch to the button onClick
17        <button type="button" onClick={() => dispatch(beginStravaAuthentication())}>Authorise on Strava</button>)
18      }
19    </div>);
20};
21
22export default HomePage; r is authenticated) const auth = useSelector((state) => state.auth); // create a dispatch function const dispatch = useDispatch(); return ( <div> <h1>Home</h1> {/* Use the auth state to show hide the button */} { auth.isAuthenticated ? ( <h2>Logged in</h2> ): ( // add the dispatch to the button onClick <button type="button" onClick={() => dispatch(beginStravaAuthentication())}>Authorise on Strava</button> )} </div> ) } export default HomePage;
Now if you click the button then the STRAVA_AUTH_START action appear in the Redux dev tools. Next we need to handle it.
Now we need to use the details from the Strava API app we setup earlier.
In the root create a .env file with the following, then stop and restart your app or the new ENV variables will not be in your app.
1REACT_APP_STRAVA_CLIENT_ID=your_id REACT_APP_STRAVA_CLIENT_SECRET=your_secret NOTE: Again, in this tutorial I will be sending my applicationsecret keyfrom the front end asREACT_APP_STRAVA_CLIENT_SECRET. This is NOT SECURE! The token is visible in the code for all to see. It should be sent by a backend service. In a future post I will cover setting upNetlify functionsto keep the secret a secret. DON'T use ths for production code.REACT_APP_STRAVA_CLIENT_IDis ok to be public and will always remain this way.
Create src/redux/sagas/auth.js
1import { takeLeading, call } from "redux-saga/effects"; import {STRAVA_AUTH_START} from "../constants/auth"; const clientID = process.env.REACT_APP_STRAVA_CLIENT_ID; function handOffToStravaAuth() { // Get the current address of the app running eg localhost or mycoolapp.io const { origin } = window; // push the Strava authorise url onto the browser window with our PUBLIC clientID and the return url (origin) // Note the redirect_uri=${origin}/token - this is the token page we setup earlier. window.location.assign(`https://www.strava.com/oauth/authorize?client_id=${clientID}&redirect_uri=${origin}/token&response_type=code&scope=activity:read_all`); } function* beginStravaAuthentication() { // A simple generator function // Just yeilds one other function - handOffToStravaAuth yield call(handOffToStravaAuth); } export function* beginStravaAuthAsync() { // This will listen for the first STRAVA_AUTH_START and then call beginStravaAuthentication yield takeLeading(STRAVA_AUTH_START, beginStravaAuthentication); } If you click the Authorise on Strava button now, nothing will happen as we need to link up the sagas:
1import { all } from "redux-saga/effects"; // Import the new async function we created above import { beginStravaAuthAsync } from "./auth"; export default function* rootSaga() { // Add beginStravaAuthAsync to the rootSaga yield all([ beginStravaAuthAsync()]); } Now when you click the button:
beginStravaAuthenticationis dispatched- The saga middleware handles the action
STRAVA_AUTH_STARTto every function in theyield all([...]) - The
beginStravaAuthAsyncresponds to it as it's listening forSTRAVA_AUTH_START.takeLeadingmeans that if you click the button multiple times only the first action is handled until it completes. beginStravaAuthenticationyields a single function using call -handOffToStravaAuthhandOffToStravaAuthpushes the authorise url to the browser which loads Strava's auth dialog- The user authorises the app
- Strava returns the app to the
redirect_uriwith a token as a querystring parameter. eg.http://localhost:3000/token?state=&code=ee7c5a... ...1f073&scope=read,activity:read_all
At this point we need to handle this token and authorise that it's correct.
Next we need to install another package to handle querystrings:
1yarn add query-string Then in the Token component we need to update it to handle an incoming token on load.
1import React, { useEffect } from "react";
2import queryString from "query-string";
3
4const Token = () => {
5  const location = useSelector((state) => state.router.location);
6  useEffect(() => {
7    // pull the code out of the query string
8    const { code } = queryString.parse(location.search);
9    console.log(code);
10  }, []);
11  return (<div>Token recieved</div>);
12};
13export default Token;
14
We can now get the token from the return query from Strava. You can test this out now from the homepage by Authenticating with Strava and then logging in and confirming. You will be returned to http://localhost:3000/token?state=&code=ee7c5a... ...1f073&scope=read,activity:read_all. You should see your code in the console.
We now need to validate your code. First we import the validation action (and redux dispatch) and then we can dispatch the action when we get the code. We also have a check to see if the app is already validated, and if it is just return to the homepage as we can't validate a code again.
1import React, { useEffect } from "react";
2import queryString from "query-string";
3// New imports
4import { push } from "connected-react-router";
5import { useSelector, useDispatch } from "react-redux";
6import { validateStravaToken } from "../redux/actions/auth";
7
8const Token = () => {
9  const location = useSelector((state) => state.router.location);
10  // Get the current auth state and setup a dispatch action
11  const auth = useSelector((state) => state.auth);
12  const dispatch = useDispatch();
13
14  useEffect(() => {
15    // Check if the user/app is authenticated
16    if (!auth.isAuthenticated && code) {
17      // pull the code out of the query string
18      const { code } = queryString.parse(location.search);
19
20// dispatch the validation code to be handled by saga
21      dispatch(validateStravaToken(code));
22    } else {
23      // Push back to home page because the user is authenticated or there is no code!
24      dispatch(push("/"));
25    }
26  }, []);
27// Return nothing because this page had nothing to display
28  return null;
29};
30export default Token;
If you now reauthenticate, or refresh the page if the token code is still in the url then you should see a redux action in the dev tools but nothing else will happen:
1{ type: "STRAVA_AUTH_TOKEN_VALIDATE" payload: "ee7c5a... ...1f073" } Next we need to create a saga to handle this action type. In your src/redux/sagas/auth.js we add the following:
1import { takeLeading, call, put } from "redux-saga/effects";
2// Update to add put
3import { STRAVA_AUTH_START, STRAVA_AUTH_TOKEN_VALIDATE } from "../constants/auth";
4// add STRAVA_AUTH_TOKEN_VALIDATE
5import { push } from "connected-react-router";
6// add
7import { tokenClient } from "../../api";
8// add
9const clientID = process.env.REACT_APP_STRAVA_CLIENT_ID;
10// Add! But remember this should only ever be done for non PROD. // The secret should be on a non client app (ie backend or lambda like Netlify)
11const clientSecret = process.env.REACT_APP_STRAVA_CLIENT_SECRET;
12
13// ... the existing sagas
14// Add the new sagas
15const apiValidateToken = (code) => {
16  return tokenClient({
17    url: "/token",
18    method: "post",
19    params: { client_id: clientID, client_secret: clientSecret, code, grant_type: "authorization_code" }
20  }).then((response) => {
21    return response.data;
22  }).catch((error) => {
23    Promise.reject(error);
24  });
25};
26
27function* validateStravaToken({ payload: code }) {
28  // here you could dispatch a loading start action!
29// we dispatch a api call to validate the tokens and it returns a data object with the values we need.
30  const data = yield call(apiValidateToken, code);
31// push an the action type: STRAVA_AUTH_TOKEN_UPDATE with the data
32  yield put(updateAuthTokens(data));
33  yield put(push("/"));
34// Push the browser to the root when we are done!
35// here you could dispatch a loading end action!
36}
37
38export function* validateStravaTokenAsync() {
39  // Listen for STRAVA_AUTH_TOKEN_VALIDATE
40
41  yield takeLeading(STRAVA_AUTH_TOKEN_VALIDATE, validateStravaToken);
42}
Note! I cannot stress enough about the client secret. Anything that is on the client side is public as it is in the code that is on a users browser. In the real world™️ the token client is a backend client where the code is not available to the user!
Then we need to handle the tokens with a reducer. Update the reducers/auth.js to the following:
1import { STRAVA_AUTH_TOKEN_UPDATE } from "../constants/auth";
2// Import the constant for the action
3const initialState = { isAuthenticated: false };
4export default function(state = initialState, action) {
5 if (!action) return state;
6 switch (action.type) {
7 // The new bits case STRAVA_AUTH_TOKEN_UPDATE:
8// save the tokens to the local storage
9 localStorage.
10 setItem("refreshToken", action.payload.refresh_token);
11 localStorage.setItem("expiresAt", action.payload.expires_at);
12 localStorage.setItem("accessToken", action.payload.access_token);
13// update the state to show the app the user is logged in
14 return { ...state, isAuthenticated: true };
15 default:
16 return state;
17 }
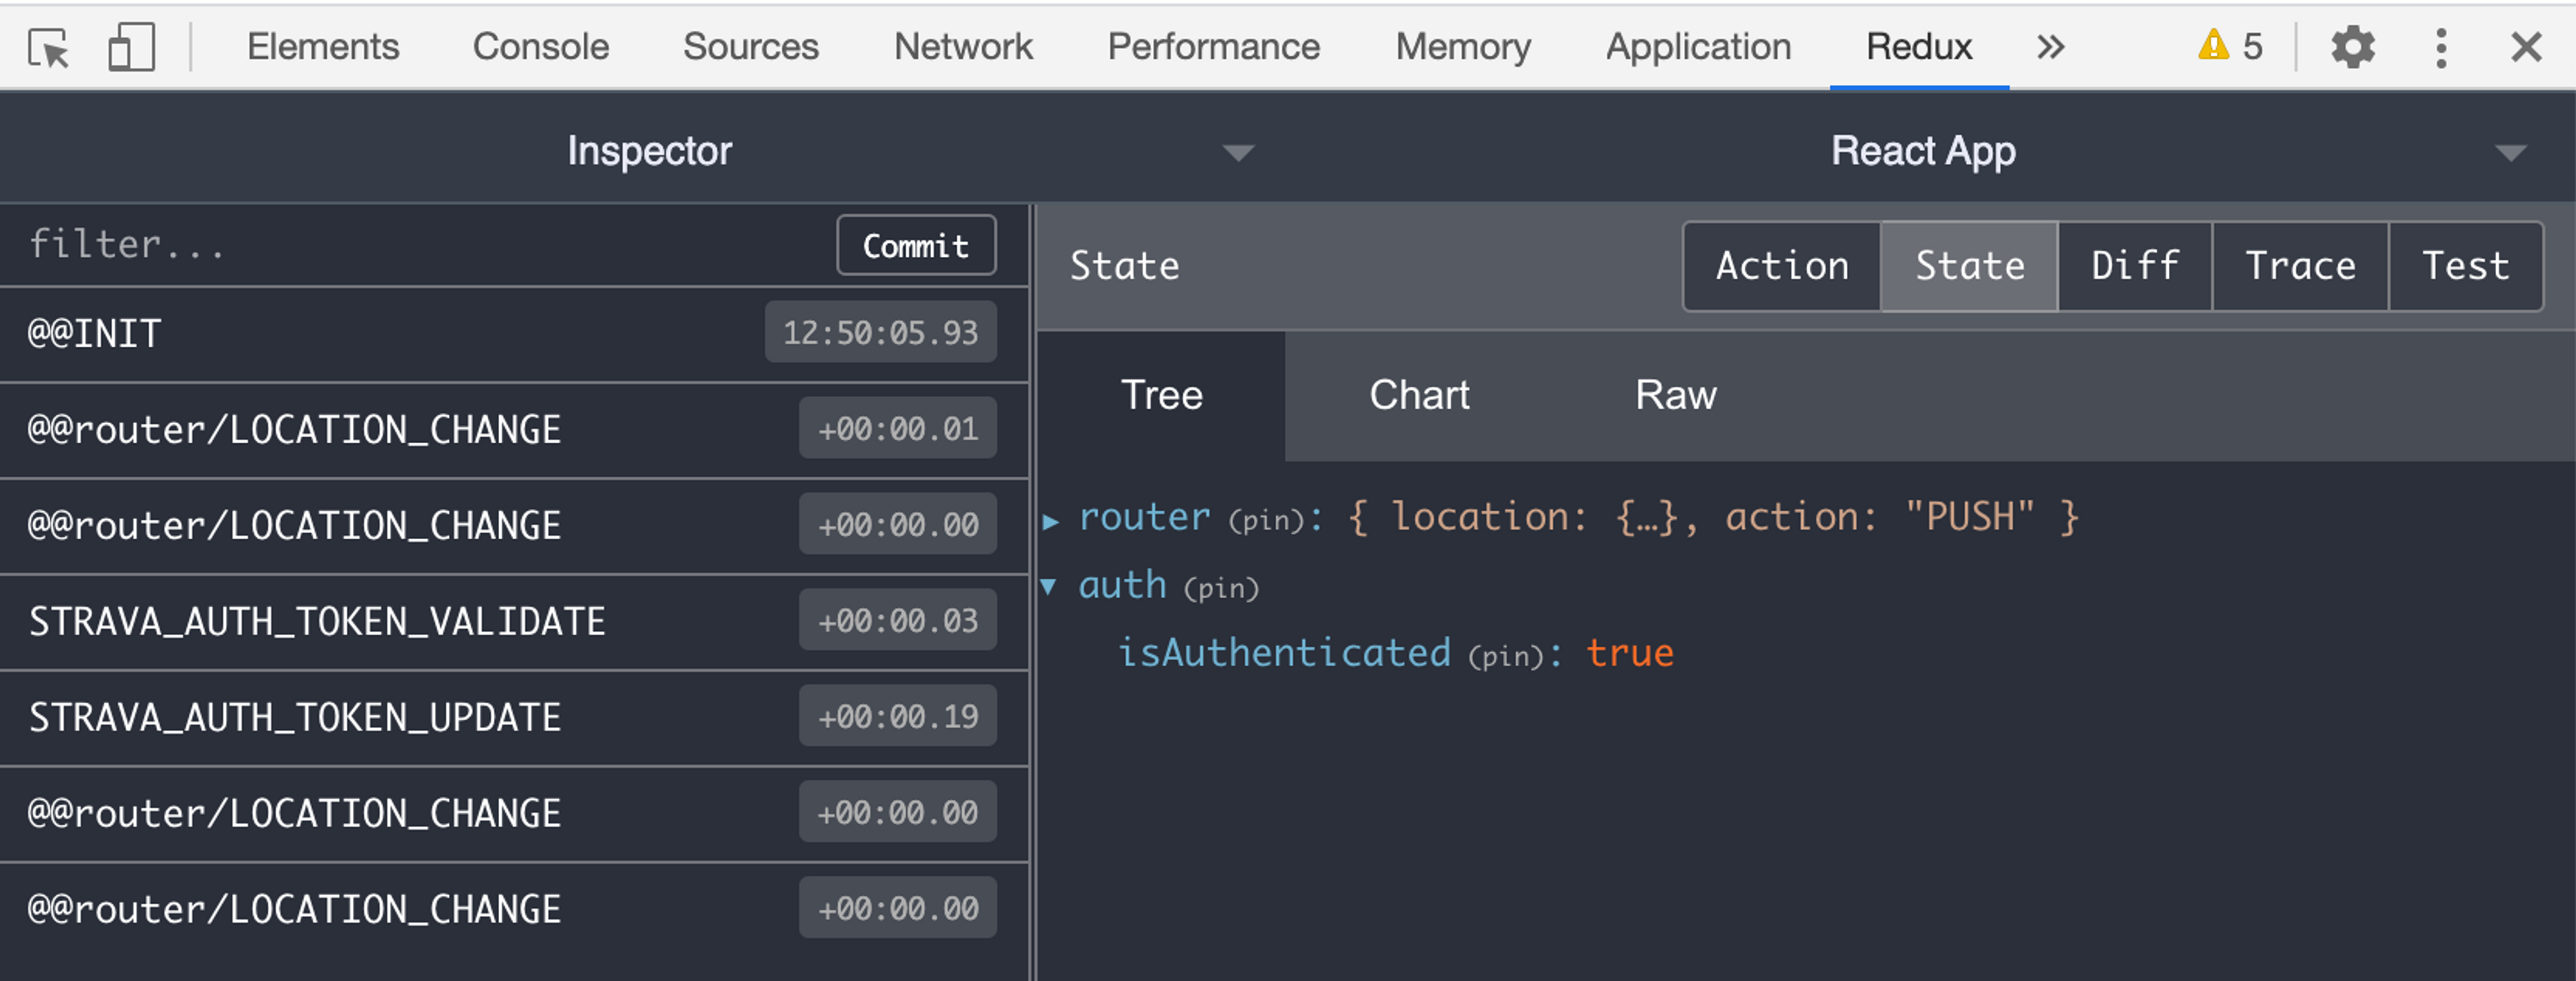
18} If you authenticate again you should now end back at the homepage and you should see the "Logged in" text and in the application data (dev tools) you can see the tokens we recieved after authenticating. It is these that we will send with subsequent requests to get data or new tokens when our existing token expires.
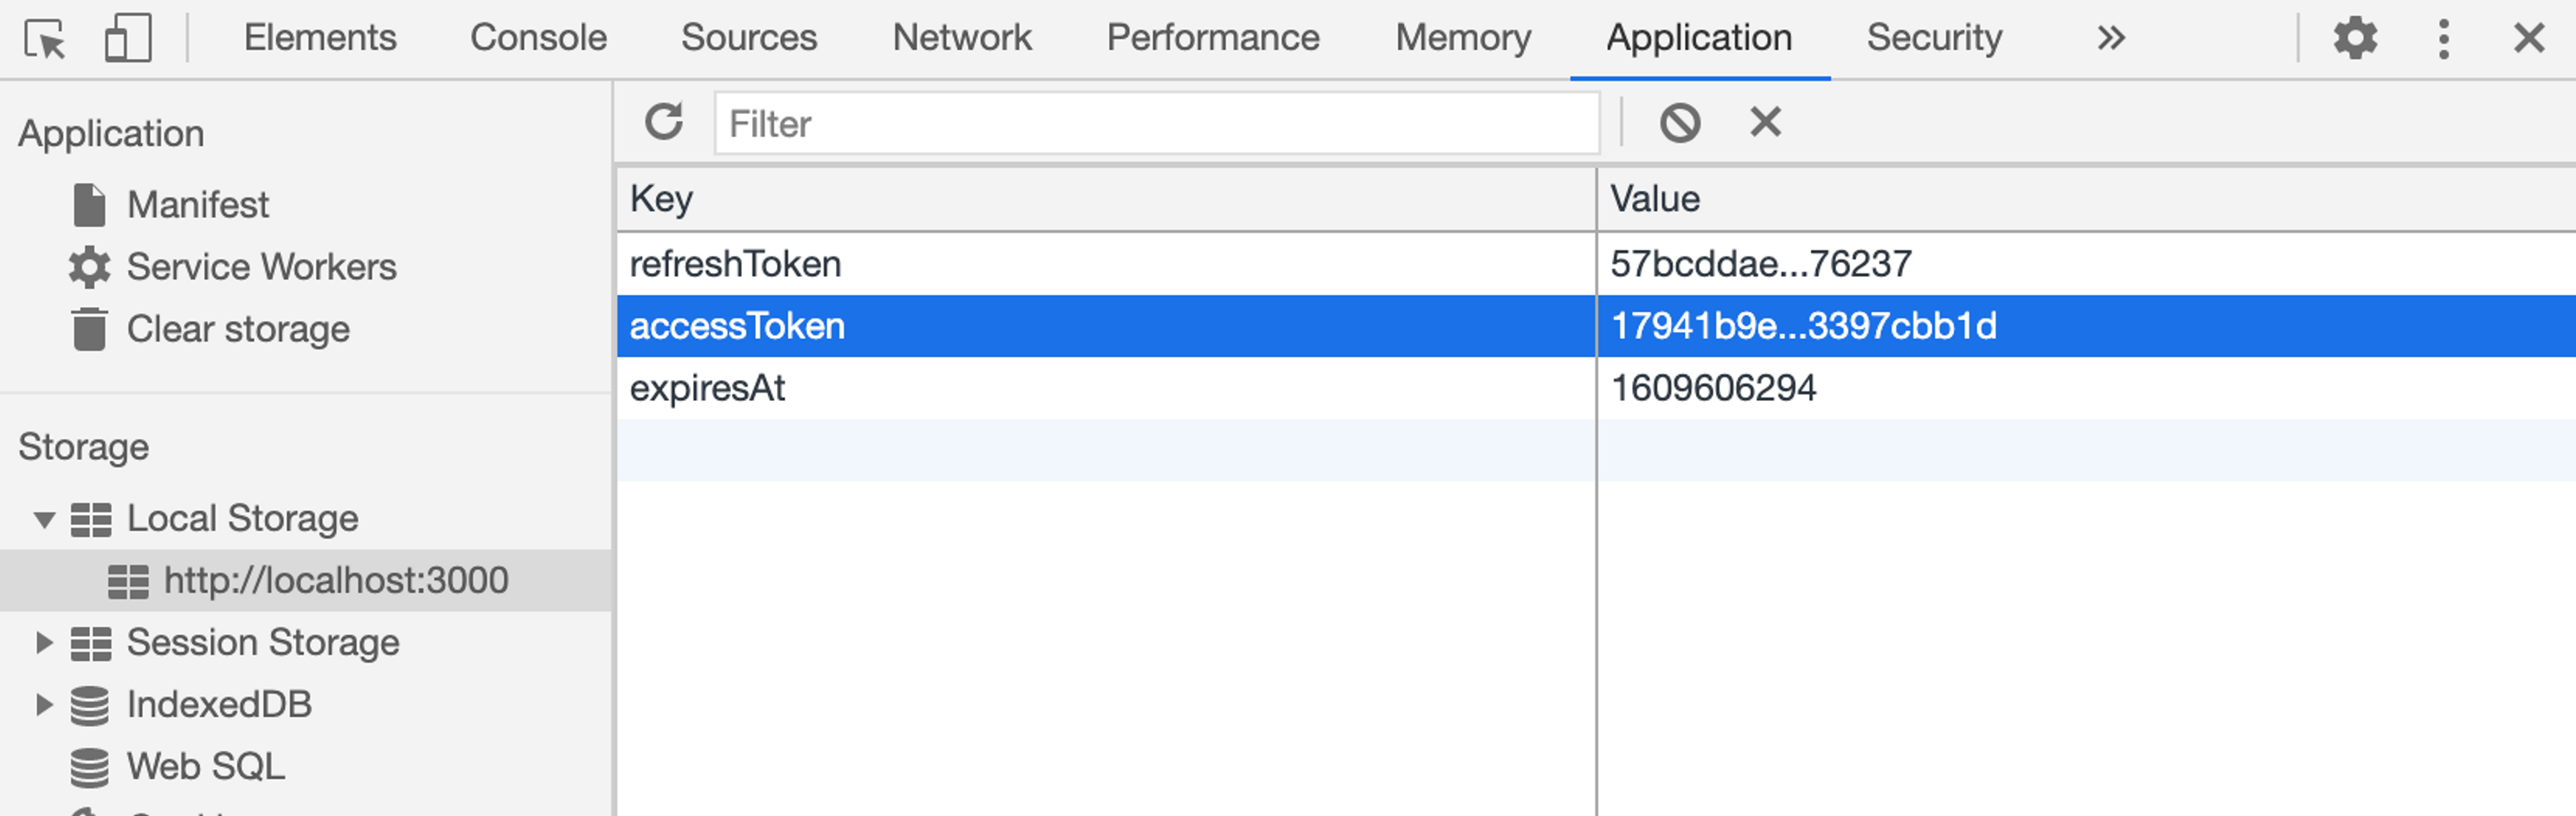
Our auth redux state should also be showing as isAuthenticated: true
Although the tokens have been stored, the redux state is not stored, so refreshing the page will reset the store. There are a few ways to persist the state:
- localstorage. This has file size limits and will eventually be full and break your app, however it's an good initial step. See below
- IndexDB - The size limit is your machine drive space so I doubt this will run out, however it's more complicated to setup so I'm not going to cover it here!
Save the state
Create a file named src/localStorage.js:
1export const loadState = () => {
2  try {
3    const serializedState = localStorage.getItem("state");
4    if (serializedState === null) {
5      return undefined;
6    }
7    return JSON.parse(serializedState);
8  } catch (err) {
9    return undefined;
10  }
11};
12export const saveState = (state) => {
13  try {
14    const serializedState = JSON.stringify(state);
15    localStorage.setItem("state", serializedState);
16  } catch (error) {
17    console.log(error);
18  }
19};
Then update the configureStore.js:
1import { createBrowserHistory } from "history";
2import { applyMiddleware, compose, createStore } from "redux";
3import { routerMiddleware } from "connected-react-router";
4import createSagaMiddleware from "redux-saga";
5import throttle from "lodash/throttle";
6// Add lodash - we will need to throttle the saving
7import { loadState, saveState } from "./localStorage";
8// Import the load and save
9import createRootReducer from "./redux/reducers";
10import rootSaga from "./redux/sagas";
11
12const sagaMiddleware = createSagaMiddleware();
13export const history = createBrowserHistory();
14const persistedState = loadState();
15// Get the state from the localstorage
16// remove the initial State from the function
17const configureStore = () => {
18  const enhancers = [];
19  const __DEV__ = process.env.NODE_ENV !== "production";
20  if (__DEV__) {
21    const { devToolsExtension } = window;
22    if (typeof devToolsExtension === "function") {
23      enhancers.push(devToolsExtension());
24    }
25  }
26  const middleware = [routerMiddleware(history), sagaMiddleware];
27  const rootReducer = createRootReducer(history);
28
29  // replace initialState with persistedState so on boot the app will use the data that exists in the state
30  const store = createStore(rootReducer, persistedState, compose(applyMiddleware(...middleware), ...enhancers));
31  sagaMiddleware.run(rootSaga);
32// subscribe to store updates so we can action saves on change to state
33  store.subscribe(
34    // throttle the save
35    throttle(() => {
36      saveState({
37        auth: store.getState().auth
38// Only save these sections of the auth
39// if we want to save other state we can add it in here
40// activities:
41        store.getState().activities, etc!
42      });
43    }, 1000)
44// 1 per second max!
45  );
46  return store;
47};
48export default configureStore();
we also need to add lodash to help throttling the saving or every single redux action would trigger it...
1yarn add lodash Authenticate your app again... then reload and you should still see the logged in state! Hurrah! Now let's get some activities!
Next
In part 2 of "Strava API activity sync with Axios, React, Redux & Saga" we will get the activities and display them.